Showing posts with label Xcode. Show all posts

Tuesday, August 10, 2021

How to Use Hierarchical Styles in SwiftUI with Colors


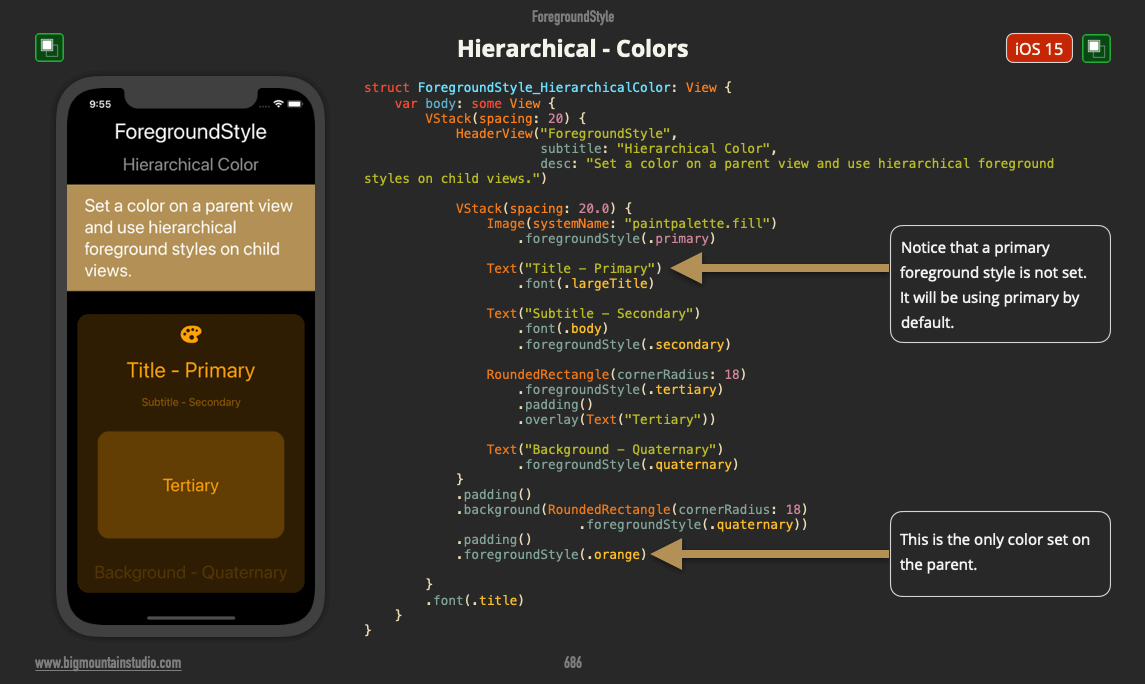
SwiftUI has 5 different style categories. Hierarchical styles are one of the categories. They can be used with or without color.

Without color these hierarchical styles use variables of black and white (for light and dark modes). You have seen this with the default text, SF Symbol and Shape colors. They use the primary hierarchical style.

Well, you can also use variations of color, not just black and white.

Start by adding a color to the parent view using:
.foregroundStyle(Color.orange)

Then when you use one of these hierarchical styles, they will use a variation of that color:


  • .primary

  • .secondary

  • .tertiary

  • .quaternary


Take a look at the example:


foregroundstyle.hierarchical.colors.png

Wednesday, August 4, 2021

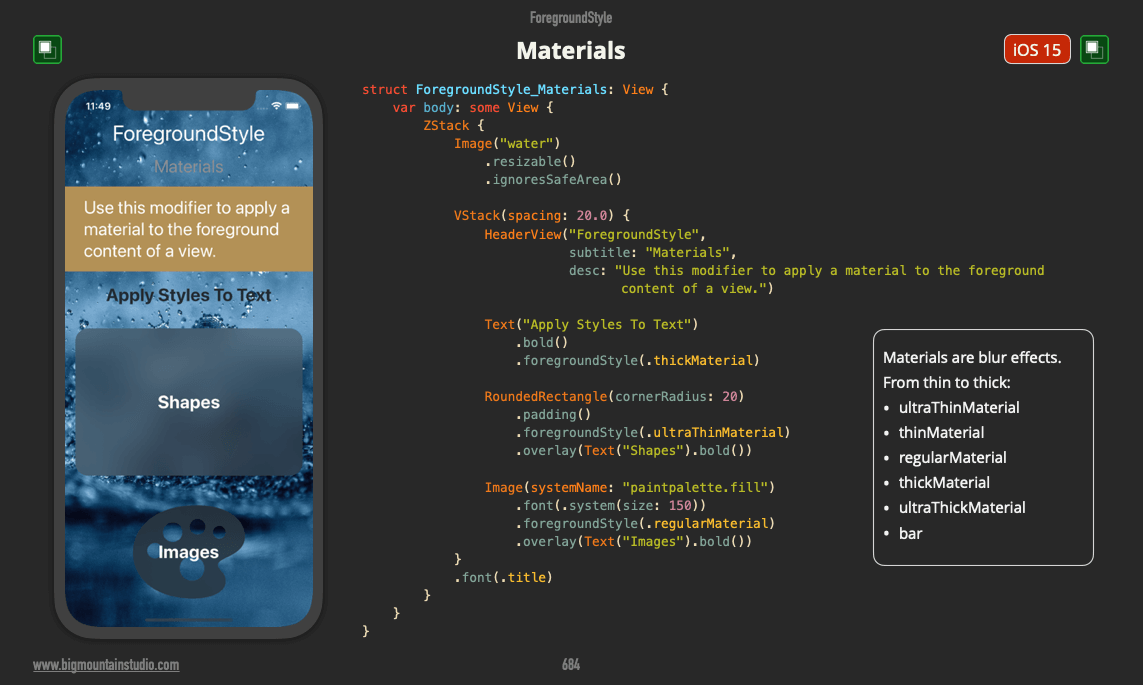
How do you use foregroundStyle or background to add blur effects in SwiftUI?

In Xcode 13 you now have access to a variety of blur effects also known as "materials".

Materials are one of the 5 categories of styles that can be applied to views using modifiers such as foregroundStyle and background.

The 5 SwiftUI Styles Categories include:

  1. Color

  2. Gradients

  3. Materials

  4. Hierarchal

  5. Semantic


When you apply a material to a view, you have a choice in how transparent and blurred the view is.

Here are 6 materials available to you:

  1. ultraThinMaterial

  2. thinMaterial

  3. regularMaterial

  4. thickMaterial

  5. ultraThickMaterial

  6. bar


Here are some examples of how to apply these materials to different views:

Text("Apply Styles To Text")
    .bold()
    .foregroundStyle(.thickMaterial)

RoundedRectangle(cornerRadius: 20)
    .padding()
    .foregroundStyle(.ultraThinMaterial)
    .overlay(Text("Shapes").bold())

Image(systemName: "paintpalette.fill")
    .font(.system(size: 150))
    .foregroundStyle(.regularMaterial)
    .overlay(Text("Images").bold())

Are you new to SwiftUI?
Go here to get a free SwiftUI Views Quick Start book.


foreground.materials.png
Note: These examples come from a book called SwiftUI Views Mastery which is a picture book reference of SwiftUI views and code that’s almost 1,000 pages.

Interested in beginning SwiftUI?

Start with the free SwiftUI Views Quick Start picture book!

Tuesday, August 3, 2021

How do use foregroundStyle to apply gradients to SwiftUI views?

In SwiftUI (Xcode 13) you can use the foregroundStyle modifier to apply gradients to views such as Text, Images, and Shapes.


RoundedRectangle(cornerRadius: 20)
    .foregroundStyle(.conicGradient(colors: [.green, .blue], 
                                    center: .center))


In this image, you can see foregroundStyle being used to apply the new conicGradient.

The conic gradient is a lot like angularGradient

What's different is you can adjust the angle with just one parameter.

Check it out:

conic.gradient.intro.png

conic.gradient.angle.png
Note: These examples come from a book called SwiftUI Views Mastery which is a picture book reference of SwiftUI views and code that’s almost 1,000 pages.

Interested in beginning SwiftUI?

Start with the free SwiftUI Views Quick Start picture book!

Tuesday, April 16, 2019

Visual Swift Memory Mastery Coupon!


A lot of people missed the free promotion. But I created a coupon code to keep the price at a minimum and to avoid Udemy's fluctuating costs.

https://www.udemy.com/swift-memory-mastery/

#SwiftLang #iOSDev #Xcode

Saturday, March 16, 2019

This search field animation is an example of "constraint animation". The constraint controls the size of an object. You can animation constraints to change height, width, and positions of your UI elements in iOS.

VIDEO TUTORIAL
https://youtu.be/_Sh8k70rSFk

PROJECT FILES
My patrons have access to this and over 65 other Xcode projects: https://www.patreon.com/posts/project-files-19092229


Tuesday, June 20, 2017

Customizing Appearance of iOS Composite Controls

An example of a "composite control" is a Search Bar.
If you want to customize one of the controls in the composite control and there is no direct property for it, then you can use the UIAppearance protocol that controls implement.

Example

 
let textfieldsInSearchBars = UITextField.appearance
    (whenContainedInInstancesOf: [UISearchBar.self])
textfieldsInSearchBars.tintColor = .lightGray
textfieldsInSearchBars.backgroundColor = .darkGray
textfieldsInSearchBars.textColor = .lightGray
 

(Swift 3)

Sunday, March 12, 2017

Show Execution Time (Elapsed Time)

Sometimes you want to see how long it took some code to execute. Here is an example of one way you could do this.
 
func myLongRunningFunction() {
    let start = Date()

    // Do you work

    let end = Date()
    let elapsedTime = end.timeIntervalSince(start)
    print("Elapsed Time: \(elapsedTime)")
}
 

(Swift 3)

Monday, March 6, 2017

iOS Tinder-Like Swipe - Part 1- UIPanGestureRecognizer (Xcode 8, Swift 3)

Create Tinder-like swiping in your app. This was a fun tutorial series to make. Hope you enjoy it!


Also, a viewer pointed out something that can make the dragging of the card code a little simpler.

Instead of:
 
let point = sender.translation(in: view)
card.center = CGPoint(x: view.center.x + point.x, y: view.center.y + point.y)
 

You can just do:
 
card.center = sender.location(in: view)
 
Easy!

Wednesday, March 1, 2017

Timer in Apps (Swfit 3, Xcode 8, iOS)

In this example I start a timer as soon as I enter the second view controller after clicking the "START MY RANDOM WORKOUT" button. Here is the code for that second view:

 
import UIKit

class ExerciseVc: UIViewController {

    @IBOutlet weak var timerLabel: UILabel!
    
    @IBOutlet weak var icon: UIImageView!
    var timer: Timer!
    var timeLeft = 60
    
    override func viewDidLoad() {
        super.viewDidLoad()

        // Call setTimeLeft every 1 second
        timer = Timer.scheduledTimer(timeInterval: 1, target: self, selector: 
            #selector(self.setTimeLeft), userInfo: nil, repeats: true)
        icon.image = #imageLiteral(resourceName: "situp")
    }

    func setTimeLeft() {
        timeLeft -= 1 // Subtract one second
        
        if timeLeft == 0 {
            stop()
        }
        
        timerLabel.alpha = 1
        timerLabel.transform = CGAffineTransform(scaleX: 1.4, y: 1.4)
        
        UIView.animate(withDuration: 1, animations: {
            self.timerLabel.text = "\(self.timeLeft)"
            self.timerLabel.alpha = 0.3
            self.timerLabel.transform = .identity
        })
    }
    
    @IBAction func stop(_ sender: UIButton) {
        stop()
    }
    
    // Show a white status bar instead of the default black one
    override var preferredStatusBarStyle: UIStatusBarStyle {
        get {
            return UIStatusBarStyle.lightContent
        }
    }
    
    func stop() {
        timer.invalidate() // Stop the timer
        dismiss(animated: true, completion: nil)
    }
}
 

(Swift 3)

Saturday, February 25, 2017

Side Scrolling UIPIckerView


The scrolling temperature is a UIPickerView rotated on its side. Here is what is happening here:

  • Rotate the UIPickerView 90°
  • Rotate the view inside each row 90°
  • Reverse the data populated into the picker
  • Resize the rotated picker so it extends beyond the view. This makes the horizontal scroller fill the entire width
Here's the code:
 
class ViewController: UIViewController {

    @IBOutlet weak var picker: UIPickerView!
    
    var data: [String] = ["60°", "61°", "62°", "63°", "64°", "65°","66°", "67°", "65°", "63°", "59°", "57°"]
    var times: [String] = ["9:00", "10:00", "11:00", "12:00", "13:00", "14:00","15:00", "16:00", "17:00", "18:00", "19:00", "20:00"]
    
    override func viewDidLoad() {
        super.viewDidLoad()
        
        picker.transform = CGAffineTransform(rotationAngle: 90 * (.pi/180))
        picker.frame = CGRect(x: -100, y: view.frame.height - 120, width: view.frame.width + 200, height: 100)

        data.reverse()
        times.reverse()
        
        picker.dataSource = self
        picker.delegate = self
        
        picker.selectRow(data.count - 3, inComponent: 0, animated: false)
    }

    override func viewDidLayoutSubviews() {
        for subview in picker.subviews{
            if subview.frame.origin.y != 0{
                subview.isHidden = true
            }
        }
    }
}

extension ViewController: UIPickerViewDataSource {
    // Like number of columns
    func numberOfComponents(in pickerView: UIPickerView) -> Int {
        return 1
    }
    
    func pickerView(_ pickerView: UIPickerView, numberOfRowsInComponent component: Int) -> Int {
        return data.count
    }
}

extension ViewController: UIPickerViewDelegate {
    func pickerView(_ pickerView: UIPickerView, titleForRow row: Int, forComponent component: Int) -> String? {
        return data[row]
    }
    
    func pickerView(_ pickerView: UIPickerView, rowHeightForComponent component: Int) -> CGFloat {
        return 100
    }
    
    func pickerView(_ pickerView: UIPickerView, viewForRow row: Int, forComponent component: Int, reusing view: UIView?) -> UIView {
        let view = UIView(frame: CGRect(x: 0, y: 0, width: 100, height: 100))
        
        let label = UILabel(frame: CGRect(x: 5, y: 0, width: view.frame.width, height: view.frame.height))
        label.text = data[row]
        label.textAlignment = .center
        label.font = UIFont.systemFont(ofSize: 45, weight: UIFontWeightThin)
        view.addSubview(label)
        
        let time = UILabel(frame: CGRect(x: 0, y: 85, width: view.frame.width, height: 15))
        time.text = times[row]
        time.textAlignment = .center
        time.font = UIFont.systemFont(ofSize: 14, weight: UIFontWeightThin)
        view.addSubview(time)
        
        view.transform = CGAffineTransform(rotationAngle: -90 * (.pi/180))
        
        return view
    }
}


Saturday, February 18, 2017

Sunday, February 12, 2017

Thursday, February 9, 2017

Wednesday, February 8, 2017

Basic UIPickerView Template

I am using extensions here just so you can see which functions belong to which protocols.
 
class ViewController: UIViewController {

    @IBOutlet weak var picker: UIPickerView!
    
    var data: [String] = ["Row 1", "Row 2", "Row 3"]
    
    override func viewDidLoad() {
        super.viewDidLoad()
        
        picker.dataSource = self
        picker.delegate = self
    }
}

extension ViewController: UIPickerViewDataSource {
    // Like number of columns
    func numberOfComponents(in pickerView: UIPickerView) -> Int {
        return 1
    }

    func pickerView(_ pickerView: UIPickerView, numberOfRowsInComponent component: Int) -> Int {
        return data.count
    }
}

extension ViewController: UIPickerViewDelegate {
    func pickerView(_ pickerView: UIPickerView, titleForRow row: Int, forComponent component: Int) -> String? {
        return data[row]
    }
}
 

(Swift 3)

Tuesday, February 7, 2017

Fun Animations with CGAffineTransform (Scale, Rotate, Reposition) Tutori...

In this video I will take you through and teach you how easy it is to do multiple animations using CGAffineTransform. I will even explain what "Affine" means. :D

Friday, February 3, 2017

How to Create Animation Chains - UIView.animate (iOS, Xcode 8, Swift 3)

Need to do multiple animations, one after another? This video will show you a pretty good way on how to accomplish this using UIView.animate with the completion block.

Sunday, January 29, 2017

How to make an Onboarding Screen (iOS, Xcode 8, Swift 3)

Show an onboarding (intro) screen the first time the user uses your app. Keep track if they saw it or not so you know if it should come first.

SwiftUI Search & Filter with Combine - Part 3 (iOS, Xcode 13, SwiftUI, 2...

In part 3 of the Searchable video series, I show you how to use Combine in #SwiftUI for the search and filter logic connected to the searcha...